Painting experiment

Secrets, tips, tools, design considerations, materials, the "science" behind it all, and other topics related to building the cars and semi-trucks.
User avatar
Noskills
Master Pine Head
Master Pine Head
Posts: 787
Joined: Tue Jan 31, 2012 12:37 pm
Location: Bellevue, WA

Painting experiment

Post by Noskills »

The photos dont do this justice but I thought I would post this stuff anyway.

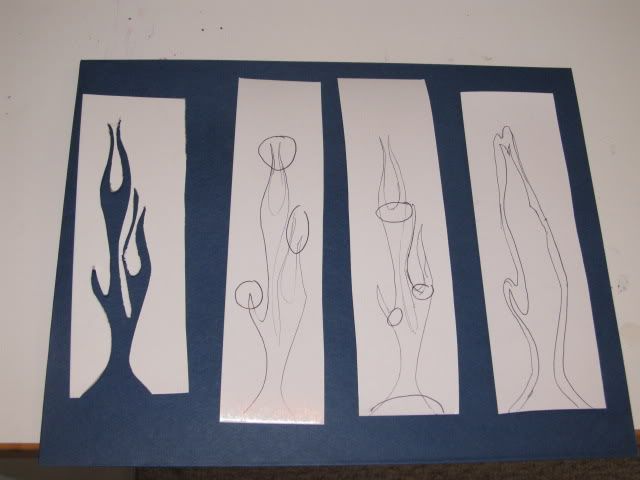
So I have been wanting to paint some flames and I got some tips from you all. I also bought some paint and was not sure if it was enamel or lacquer based. So I decided to do an experiment.
I bought some pine shims which are pretty close to a thin car, and primed them all with Rustoleum auto primer.
Image

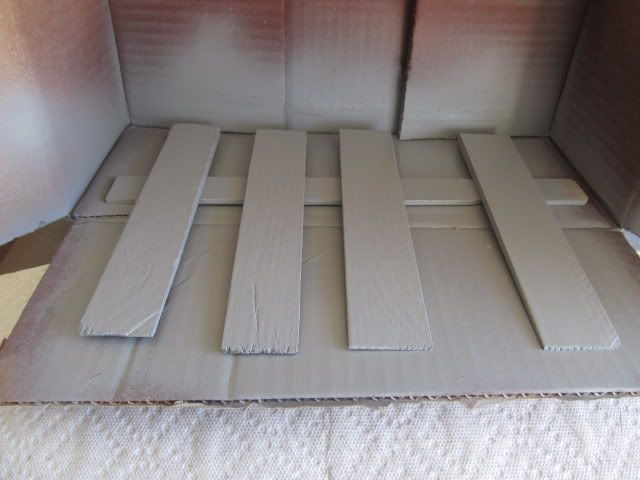
Then I painted 3 metallic blue and 1 metallic silver
Image

This was what I did:
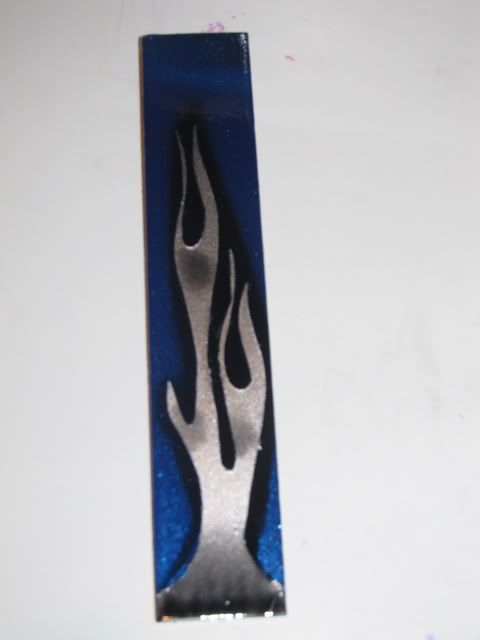
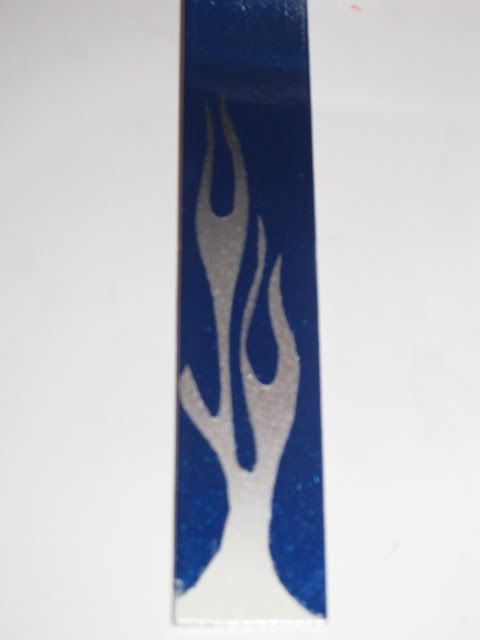
Car 1 got primer, blue paint, then lacquer clear, then sliver flames then lacquer clear.
Car 2 got the same but the final coat was enamel clear
Car 3 got primer, blue paint, silver flames then lacquer clear.
Car 4 got primer, silver paint, a positive stenciled flame, blue paint, then lacquer clear

[imghttp://i1060.photobucket.com/albums/t458/stoback/IMG_1378.jpg][/img]

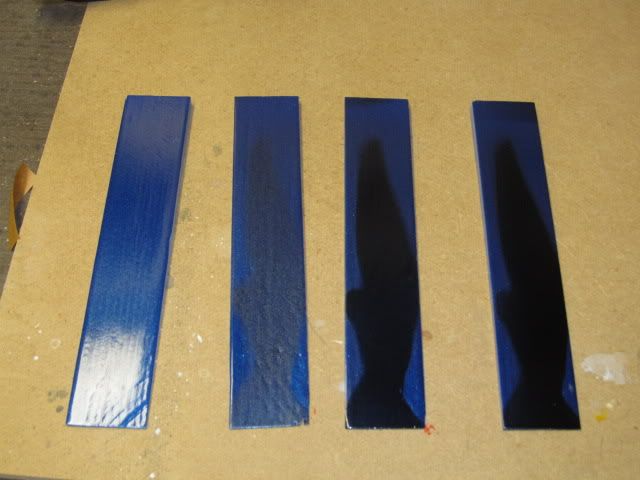
Here is how they came out:
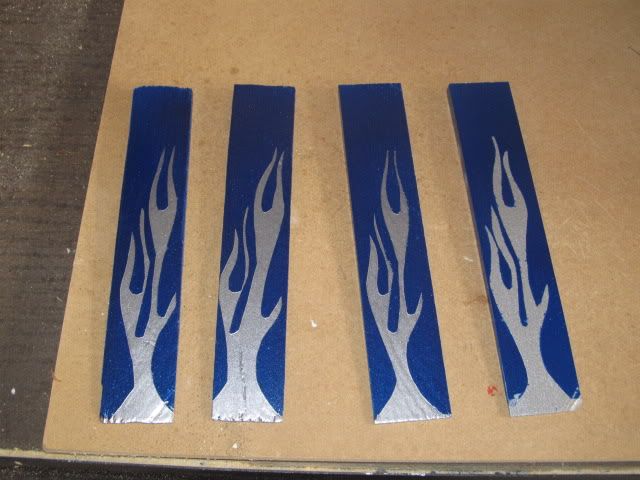
Image

What I learned:

1.The metallic paint must be lacquer based or it would have gotten messed up when I covered it with enamel clear.
2. I did not notice any difference if I coated the base coat with clear prior to putting on the flame. (I hear from Bill its better if you need to sand)
3. The enamel clear at the end was a tiny bit shinier than the lacquer.
4. Once the stencil is on, painting your first layer the same color as the base paint really does help with the bleeding under the tape (thanks Darin)
5. Its much easier to apply a postive stencil than a negative.
6. My wife is going to make me fix something if I keep going to the hardware store and spending all my time painting shims :eek:

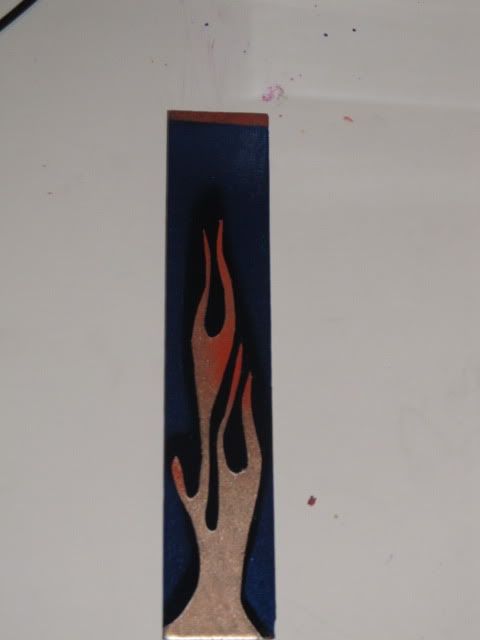
Next I plan to practice my technique. Hoping to really make this silver flame pop. I am thinking of either trying to put a black shadow under it or hitting the tips of the flame with some orange.
Any suggestions?

Noskills
"Nunchuk skills... bowhunting skills... pinewood derby skills... Girls only want boyfriends who have great skills!"
Napoleon Dynamite
Speedster
Pine Head Legend
Pine Head Legend
Posts: 1972
Joined: Sat Feb 18, 2012 1:48 pm
Location: Toledo, Ohio

Re: Painting experiment

Post by Speedster »

Quite Frankly, for a 1st time try I think you are doing extremely well. I would cut out a simple design using a Pinewood Derby block, sand the block smooth, load the block up with primer, wet or dry sand the block so there is no wood grain showing and lay out your design again. Since the enamel clear leaves a better gloss, put on 4 or 5 coats of clear, leaving it dry between coats. See what you end up with and go from there. Congratulations, you're doing GREAT!!!! You have a lot of energy and patience.
macd
Pine Head
Pine Head
Posts: 53
Joined: Thu Nov 18, 2010 6:11 pm
Location: North Carolina, US

Re: Painting experiment

Post by macd »

Thanks! I'm hoping to encourage my so to graduate from decals to stencils next year.
Can you tell us more about your stencils? Did you make them yourself? From what material? Any issues with paint coming up when removing the stencil?
User avatar
Noskills
Master Pine Head
Master Pine Head
Posts: 787
Joined: Tue Jan 31, 2012 12:37 pm
Location: Bellevue, WA

Re: Painting experiment

Post by Noskills »

I made the stencils using blue painters tape. I found a nice flame example on the internet and then shrunk it to fit my size. I used the pattern to trace onto some heavy stock paper. I then used this to outline the stencil four times. I put the painters tape on wax paper. That actually worked pretty well. I tried to make the coats as light as I could. I peeled off one when the paint was tacky and the others when the paint was dry- did not have any sticking or peeling issues either way but got more paint on me when the paint was tacky. I think when I have gotten better that this I will buy a stencil as cutting out the fine pattern is tough, you need tiny sicsors.
Man it was fun. I am jonesing for an airbrush but I think my wife would divorce me :/

Noskills (Seth)
"Nunchuk skills... bowhunting skills... pinewood derby skills... Girls only want boyfriends who have great skills!"
Napoleon Dynamite
User avatar
drathbun
Master Pine Head
Master Pine Head
Posts: 195
Joined: Tue Jan 17, 2012 1:50 pm
Location: Carrollton, Texas

Re: Painting experiment

Post by drathbun »

Noskills wrote:...as cutting out the fine pattern is tough, you need tiny sicsors.
I put the tape on a scrap piece of soft wood and cut mine out with an x-acto blade, they can be quite cheap (even for a full set) at hobby stores.
User avatar
Noskills
Master Pine Head
Master Pine Head
Posts: 787
Joined: Tue Jan 31, 2012 12:37 pm
Location: Bellevue, WA

Re: Painting experiment

Post by Noskills »

Phase II of the painting experiment

Image
I cut out some other stencils in addition to the flame stencil in order to try to highlight the flame tips and loops, and to create a shadow under the flame. Got those ideas by watching you tube videos.

Here are a few more shims with shadows painted on them. The first has no shadow:
Image

Here are the results, "car" 1 with a sliver flame, shadow and some shading:
Image

#2 with a fade from white to dark silver. Did this by spraying a band of white, blended it with grey, then black, then covered it all in silver:
Image

#3 with a shadow and orange tips. The orange was enamal and did not mix well with the lacquer (plus the small can of Testers did not have a very fine mist when sprayed:
Image

I like # 2 the best. Which do you like?
Think I am ready to paint a car now :D
Noskills
"Nunchuk skills... bowhunting skills... pinewood derby skills... Girls only want boyfriends who have great skills!"
Napoleon Dynamite
Speedster
Pine Head Legend
Pine Head Legend
Posts: 1972
Joined: Sat Feb 18, 2012 1:48 pm
Location: Toledo, Ohio

Re: Painting experiment

Post by Speedster »

#2 Looks good to me. Make sure there is no wood grain showing in the primer and I know It will come out beautiful. Best of Luck.
User avatar
whodathunkit
Pine Head Legend
Pine Head Legend
Posts: 2477
Joined: Sat Apr 25, 2009 5:56 pm
Location: Forgan, OK

Re: Painting experiment

Post by whodathunkit »

Noskills,

The paint experiments are looking like you are a Pro at painting. ;)
What type of automobile can be spelled the same forwards & backwards?
cubmasterbob
Journeyman
Journeyman
Posts: 28
Joined: Sat Mar 03, 2012 7:36 am
Location: Aurora, Illinois

Re: Painting experiment

Post by cubmasterbob »

There's two ways of doing "da flame job"...old school is colored in solidly and some blend in white, yellow and orange to the red for added looks...the new way is doing faded licks and connecting them faintly to replicate real fire.
If the real thing look is what you want to try, grab your AB and watch the guy on vimeo.com, airbrushtricks.com or search "true fire".
BTW- "AB" is "air brush" if your not familiar.
rpcarpe
Master Pine Head
Master Pine Head
Posts: 736
Joined: Wed Mar 17, 2010 11:58 am
Location: Huntsville, Alabama

Re: Painting experiment

Post by rpcarpe »

Nice flames, thanks for sharing those with us.
My wife started a new support group... Widows of the Pinewood Derby.
User avatar
Noskills
Master Pine Head
Master Pine Head
Posts: 787
Joined: Tue Jan 31, 2012 12:37 pm
Location: Bellevue, WA

Re: Painting experiment

Post by Noskills »

Cubmasterbob,
Think I will stick with the cans for now but there may be an AB in my future. Will try a classic flame soon. Working on my Civil War car and I want a flame dividing the blue and grey. Will likely need to cut a hole in some cardboard to make sure I can blend from white to yello to orange in a 7 in flame. Will post after its done. Will lilkly practice on a 2x4 first.
Noskills
"Nunchuk skills... bowhunting skills... pinewood derby skills... Girls only want boyfriends who have great skills!"
Napoleon Dynamite
cubmasterbob
Journeyman
Journeyman
Posts: 28
Joined: Sat Mar 03, 2012 7:36 am
Location: Aurora, Illinois

Re: Painting experiment

Post by cubmasterbob »

Noskills wrote:Cubmasterbob,
Think I will stick with the cans for now but there may be an AB in my future. Will try a classic flame soon. Working on my Civil War car and I want a flame dividing the blue and grey. Will likely need to cut a hole in some cardboard to make sure I can blend from white to yello to orange in a 7 in flame. Will post after its done. Will lilkly practice on a 2x4 first.
Noskills
Noskills, I love a good rattlecan as much as anyone else...quick and easy. However, most of us have run across those that either lay out the paint in buckets{too thick/too much comes out at once} or it comes out too thin and takes alot of repete coats- more than usual. Multiple thin coats is always the best way, but some of these rattlecans just over-do that. An AB can fix this since you set the paint/thinner mixture and the pressure too. It is intimidating at first, but like anything, once you learn it, it's easy. Another thing ABs are great for is custom colors that you can't find in rattelcan form.
As far as your blending of colors for the flames, I saw an article long ago in a model car mag that said to completely mask off the car body except the flamed area, paint your light colors 1st{harder to cover dark colors}, when dry hold the rattlecan back{like 12"-16"} and fog the color in thru mist coats. Keep fogging in farther forward to create a solid area for the next color. When it's dry and redo the process, moving farther forward with a new color. They showed this for a 1/25 scale drag rail body that had 5 fogged/faded colors the whole length of the body...no set paint edged color changes....really cool!
User avatar
whodathunkit
Pine Head Legend
Pine Head Legend
Posts: 2477
Joined: Sat Apr 25, 2009 5:56 pm
Location: Forgan, OK

Re: Painting experiment

Post by whodathunkit »

No skills,

Thanks for the tips on the flames.

The paint can handle did the trick. ;)
Image
How did I do on fog painting the flames?
What type of automobile can be spelled the same forwards & backwards?
Speedster
Pine Head Legend
Pine Head Legend
Posts: 1972
Joined: Sat Feb 18, 2012 1:48 pm
Location: Toledo, Ohio

Re: Painting experiment

Post by Speedster »

Looks Gorgeous. Very clean lines.
User avatar
Noskills
Master Pine Head
Master Pine Head
Posts: 787
Joined: Tue Jan 31, 2012 12:37 pm
Location: Bellevue, WA

Re: Painting experiment

Post by Noskills »

Mark,
Looks like a smooth transition. Flame up that front loader :D
I am trying a classic hotrod flame; just got the yellow this morning. I also want to experiment with real looking flames without the airbrush. Seems to me that to get the flame licks in a small area that I will need to make a stencil than can paint small overlapping licks,then fog over them to blend them in. Of course have not tried it yet. Did play with blending orange and red in one long thin flame over the weekend- it was OK but I decided that I needed some yellow.

Have my Civil War car painted half blue and half grey with conferate and American flags. Now I plan to paint real flames up the front and side. Should be cool. Got my Civil War inspiration this weekend by bringing the Tigers to Gettysburg. What a hoot.

Noskills (Seth)
"Nunchuk skills... bowhunting skills... pinewood derby skills... Girls only want boyfriends who have great skills!"
Napoleon Dynamite
Post Reply