
Thanks to all you fine folks, I'm happy to say that we won the pack. It was a small field of 13, but it was great to see one of my boys (I have an older son and we never did very well when he went through cubs) finally place. Oddly enough, I was actually hoping we'd maybe place third or second so that we'd have room to improve next year, but I'm not complaining. Last year we tried to do a rail rider, but because I attempted to free drill the axle holes with my drill press and got some wander, the alignment never really worked out.
This year I decided he should learn about jigs, since last year we tried everything free-hand. I decided to invest about $50 in three tools ($12.50 per year for the next four years, right?): an axle hole drilling jig (Pinewood Pro), and the Derbyworx axle straightener/rail riding tools.
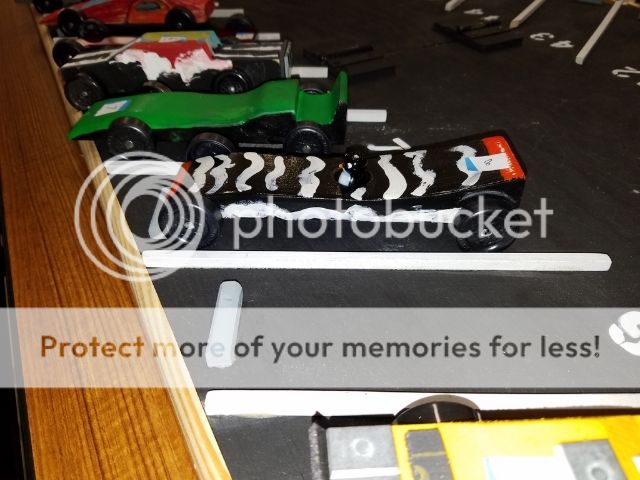
He decided he wanted to do a penguin themed car, and it so happened I had a little glass penguin bead in my stash of jewelry making supplies. He sketched out the design he wanted, we transferred it to the block, and then measured where we wanted the axles to be (rules allow for extended wheel base).
I showed him how to use the jig, drilling some practice holes on an old block of pine, then we clamped it to his block and he drilled his holes by hand, with one raised front wheel...
Then we headed out into the shop to use the drill press for weight holes - we did 5 1/4" holes almost all the way through in the rear of the car for pencil weights, and then a whole bunch of shallow holes in the bottom to lose some wood in the front of the car. He really enjoyed working the drill press. I'd move the vice, he'd turn on the laser (really unnecessary, but he thought it was fun), and drill down to the tape mark we put on the bit, then repeat. I showed him how to chisel out the remaining wood and we called it a day after drilling a 3/32" pilot hole all the way through the block to guide the spade bit for the driver's seat later on. His attention span had been exhausted).
Next day (Saturday) he was excited to work, so I went out and clamped the block down so I could use the jigsaw. One of these days I'll find someone with a scroll saw (or buy one) so he can do the saw work himself. We have a few years, at least. Anyway, got the profile cut and then turned him loose with the sand paper and sanding block. I helped him sand out a couple of rough spots, and after 220 sandpaper he declared it was "smooth enough." We went back to the drill press and drilled a 1/2" hole part way through with the spade bit so the driver could sit, he sanded the edges, and then, against my better judgement, we masked the axle holes and I turned him loose with the spraypaint.
Sunday was trim paint day. He selected orange enamel paint for the front and back, and some white enamel paint for a design on the sides and top. After cleaning up and setting aside to dry, it was back to the drill press to file 8 axles. Last year I think we over-filed, so this year we colored the axles near the head with a sharpie. We filed until the black ink was no longer visible and then stopped.
At this point, we tried the axle press. I was rather skeptical that we'd get any real effect from putting the axles into it, hammering, turning, hammering, turning, and hammering, but amazingly enough about half the axles actually went back to the drill press much straighter than they had been. Some seemed unaffected, which suggests to me that the axles are not of uniform hardness. We elected to square the heads using the tool, but not to taper them.
Monday after homework, we polished axles in the drill press. Wet 400,600,1000,1500,2000,2500, #6 Mibro polishing compound, and leather cording to buff. It was super cold in the shop, so we brought the press in to the kitchen table. We took turns since we were going to share the axles (Dad had to build a car too, after all).
Tuesday we sorted wheels from our two kits plus an extra two tubes I had bought. Using the Maximum Velocity wheel chart, we sorted out the number 2, 7, and 15 wheels, picked an axle, spritzed some graphite, and started spinning. We picked the three wheels that had the smoothest sound and best "feel". We then took one of the runner-up wheels and spun it on each of the axles to pick three axles. They were not all equal, so we chose the best two axles for the rear wheels and the next best axle for the front wheel, then headed out to the garage to bend them, in theory 2.5 deg for the rears and 1.5 deg for the front.
The pro rail rider tool didn't yield very consistent results. We brought some other runner up axles out and bent them as well, then tried to pick two that looked to be similar in bend for the rear wheels. We paried them with their wheels and called it a day.
Wednesday before school, we put the clear coat onto the car body. After school, we epoxied the penguin driver into his hole. We then built our test board using a $10 4 foot MDF shelf and two 2 foot pieces of 1/4" x 1 1/2" poplar with some wood glue. On the smooth side, we marked a center line and then 1" increments at the end of the board going left and right so that we could check drift.
Thursday we filled the wheels with graphite again and pushed the axles into place, gapping the rears with a credit card (0.030" and the FDW with cardboard from the box (0.015"), since we didn't narrow the front of the car we wanted to give a little more room to keep the rear wheels clear of the strip. We then went to the alignment board and checked rear and forward migration of the rear wheels, as well as watching for wobble. After some minor adjustments, we set up to steer 2" toward the rail over 4 feet. Finally, we did a final weight adjustment, weighing at 5.00 oz on our home balance. We checked the alignment, then made sure on the strip side of the board that the rear wheels didn't touch the strip once the FDW made contact.
And for the first time in our household's history, a pinewood derby car was finished a full day ahead of the race. We put it in a shoebox and agreed not to touch it until race day.
Friday, I built my car using the leftover axles and wheels, along with a mini spy camera I got off Amazon for $25. At 10g total weight, it was easy to build onto the car and I figured it might capture some fun footage. I adjusted it for 2" toward the rail (but opposite my son's car) and put it in the box next to my son's car.
Saturday was race day. We got there early to help with setup. As the boys showed up with their cars, some of them were getting them out and playing with them. My son got his car out. I saw him and told him "Son, that's your car. What you choose to do with it now is up to you. I just want you to know that you spent a lot of time this week working on it aligning it, and getting it ready to race. If you play with it now, it might affect its performance. But it's up to you."
He looked at me, smiled, and said "I'm going to put it back in the box and play with it after the race." Proud moment. After we finished setting up, we cleaned the outside of the wheels with some 91% Isopropyl alcohol, applied graphite, spun the wheels, and went to check in. He weighed in at 4.95 oz on the official scale. We did not augment.
He went undefeated in 15 heats (we use a point elimination system). My car went undefeated in 5 heats of non-cub scout racing. All in all, a good day for our family, but a little awkward since I was doing all the announcing!
Here's his car in the impound:
And my car:

Some video from my car's first couple of races. After that the camera got turned off by a helpful scout who thought he was turning it on.
https://youtu.be/
Final stats on my son's car:
2" drift towards rail over 4'
1.5" COM - extended wheelbase, 1/4" lead pencil weights
2.5 deg (approx) negative cant on rear wheels
1.5 deg (approx) positive cant on FDW,
The track is an older wood track and while he consistently beat the 2nd place car by 1/10 - 1/8 of a car length (we have no timer, just a SOF gate), my son's car was slower on the slope but faster on the flat. I am wondering if with such a conservative COM, 2" of drift was more than necessary resulting in extra drag against the rail. Next year perhaps we can work to move the COM back to reduce the authority of the FDW. Also, I think next year we'll try and polish the inside of the FDW beyond just rubbing graphite on it. Possibly do some bore prep on the wheels? Switch to tungsten? I'd like to teach him something new each year along with having him do more and more of the work.
Anyway, thanks everyone for contributing to this site. As I told my son, the process of building the car, learning new skills, learning about the principles involved, and spending time together were the real prizes. The trophy was just icing on the cake. Sweet icing, though
Andre

